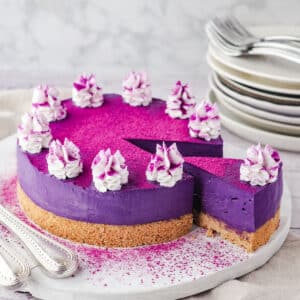
Ube Cheesecake
This no bake ube cheesecake with coconut is the perfect classic combination of stunning purple ube and creamy coconut. It's beautiful and delicious!
Equipment
- Spring form cake tin, 7" x 2.5" (18cm x 6.5cm) or similar
- Electric hand held beaters or stand mixer *its usefull but not essential to have two mixing bowls.
- Stick/immersion blender with chopping bowl attachment or food processor
- food safe acetate and/or parchment paper
- piping bag and piping tip (I used a 2d)
Ingredients
For the cheesecake base
- 2 & ⅓ cups (250gms) Graham cracker crumbs
- ¼ cup (20gms) desiccated coconut
- 1 stick (½ cup/ 115gms) unsalted butter
For the cheesecake filling
- 2 x 8 ounce tubs (450gms total) full fat cream cheese
- ½ cup (110gms) granulated sugar
- 2 teaspoons ube extract
- 1 cup (250mls) thickened cream
To decorate the cheesecake
- 1 can (14oz/395gms) full fat coconut cream
- ½ tablespoon powdered sugar
- ½ tablespoon purple yam ube powder
Instructions
To make the cheesecake base
- Line the base and sides of a springform tin with parchment paper.
- Dry roast the desiccated coconut in a skillet until golden brown. Have a heatproof bowl ready to remove from the heat as soon as it's done as it can burn easily.
- Break up the cookies and blitz briefly in a food processor into crumbs.
- Melt the butter by cubing, adding to a microwave proof bowl and microwave for a minute or two.
- Add the cookie crumbs and toasted coconut to a bowl and mix well. Pour the melted butter in and mix until it resembles fine bread crumbs.
- Pour into lined springform tin and press down at the bottom to form the base. Do not press to firmly or your base may become to hard.
- Chill in fridge for at least one hour and up to overnight.
- Put your can of coconut cream to chill in the fridge at the same time as your base. The coconut cream needs to chill for at least four hours, preferably overnight.
To make the cheesecake filling
- NB Make sure your cream cheese is at room temperature.
- Beat the cream cheese briefly to soften. Add the sugar and beat on low until combined and the sugar has all dissolved. Add the ube flavoring and mix well.
- In a separate bowl whip the cream until firm peaks form. Add the whipped cream to the rest of the cheesecake mix and gently fold in until well combined, taking care not to knock any air out of the mix.
- Put the cheesecake filling onto the prepared base and smooth down. Chill in the fridge for at least four hours, preferably overnight.
To decorate cheesecake
- Once set remove the cheesecake from the springform tin and smooth down the edges with an offset spatula.
- Carefully open your can of chilled coconut cream without tipping or shaking the can. Scoop the solidified coconut cream off the top, leaving the liquid in the bottom of the can.
- Whip the coconut cream until medium peaks form. Sift in the powdered sugar and whip until firm peaks form. Do not over whip! Add the whipped coconut cream to a piping bag and pipe pretty swirls around the edge of the cheescake.
- Dust with a little purple ube powder to finish and you're done!
Notes
Coconut cream:
You will only need about ⅓ of the can of coconut cream, but you need to start with a full can to set it. Not all coconut creams are created equal so you may need to experiment to find one that whips best with the best bright white color.
Cake size:
I used a 7" x 2.5" (18cm x 6.5cm) as I like my cheesecake nice and tall with a deep cookie base. You can use a wider springform tin if that's what you have. Your cheesecake will be flatter but it will still be delicious!
Lining the tin:
Clear food safe acetate is available for some baking shops and can help give smoother sides to the cheesecake. You can use parchment paper instead if you don't have it.
Storage:
In a covered container in the fridge for up to five days, but will be fresher if eaten within three days.
Individual slices or the whole cake wrapped and frozen for up to two months, but best eaten within a month for better taste and texture.
Nutrition
Calories: 393kcalCarbohydrates: 55gProtein: 5gFat: 18gSaturated Fat: 10gPolyunsaturated Fat: 1gMonounsaturated Fat: 4gTrans Fat: 0.003gCholesterol: 27mgSodium: 361mgPotassium: 150mgFiber: 3gSugar: 26gVitamin A: 350IUVitamin C: 0.2mgCalcium: 60mgIron: 2mg
Nutritional Disclaimer
Nutritional information is an estimate based on an online database. The nutritional content of ingredients may vary by brand. If you require accurate nutritional information, you should calculate this based on the specific brands and products you are using.
Tried this recipe?Let us know how it was!
